
With the new Windows 10 search bar, you can save a considerable amount of time every day. Unlike the classic menu of Windows 7, the application searches through everything – from your documents to the installed software. If problems occur during this process and something doesn’t work, you should be able to repair the Windows 10 search without much effort.
We show you all the important steps in detail. Often the search bar remains white, no programmes are found or nothing works. So that you don’t have to carry out a comprehensive Repairing your operating system to avoid having to carry out an extensive repair, it is better to focus on a few central points, which we will explain to you in the following. Most of the time, the way to a solution is easier than you think.

You may have already done one of the following steps without success. Then just try the next one until you were able to repair your search.
How can I repair the Windows 10 search?
- Basic: Install the latest updates and restart your PC
- Use on-board remedies: Microsoft’s troubleshooter
- Repair Windows 10 search and reset process
- In case of doubt: Activate the search bar again
- Comprehensive: Restore all standard apps to factory settings
- Check Cortana and repair Windows Search
So let’s start with something that never does any harm anyway – and if it does, you can fix problematic Uninstalling updates again.
1. Basic: Install current updates and restart PC
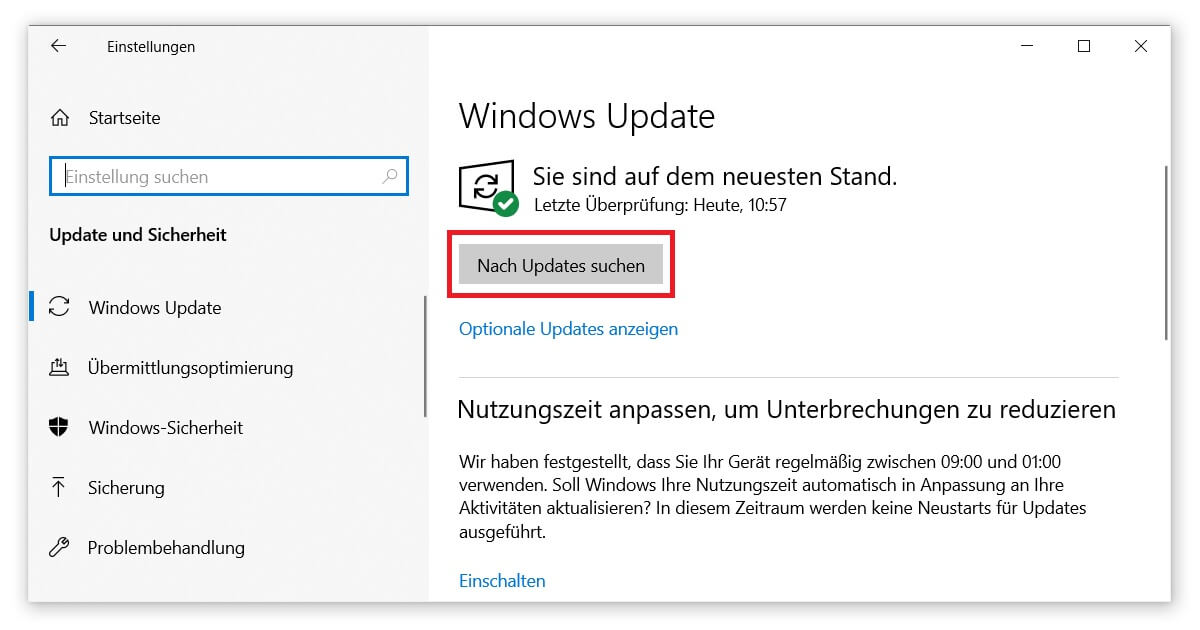
Pressing the Windows logo key together with the letter I (or alternatively the cogwheel symbol) takes you to the settings. (You may first have to change your Activate Windows key). There you select Update and Security, where you should already be in the Windows Update tab. Click on the Check for Updates button. Allow the download and installation of all updates found. If you have problems with this step, we recommend that you read our detailed guide on the topic.
Afterwards, you should restart your PC. This is always a good idea, regardless of whether an update has been installed. Because with modern devices, a restart is sometimes very different from a shutdown. Processes that would otherwise continue to run temporarily are terminated here and can be restored by the reset. This means you can also repair the Windows 10 search.
2. Use on-board remedies: The Microsoft troubleshooter
It is always amazing how many features Windows 10 comes with out of the box. This includes an extended troubleshooting if you want to repair your search:
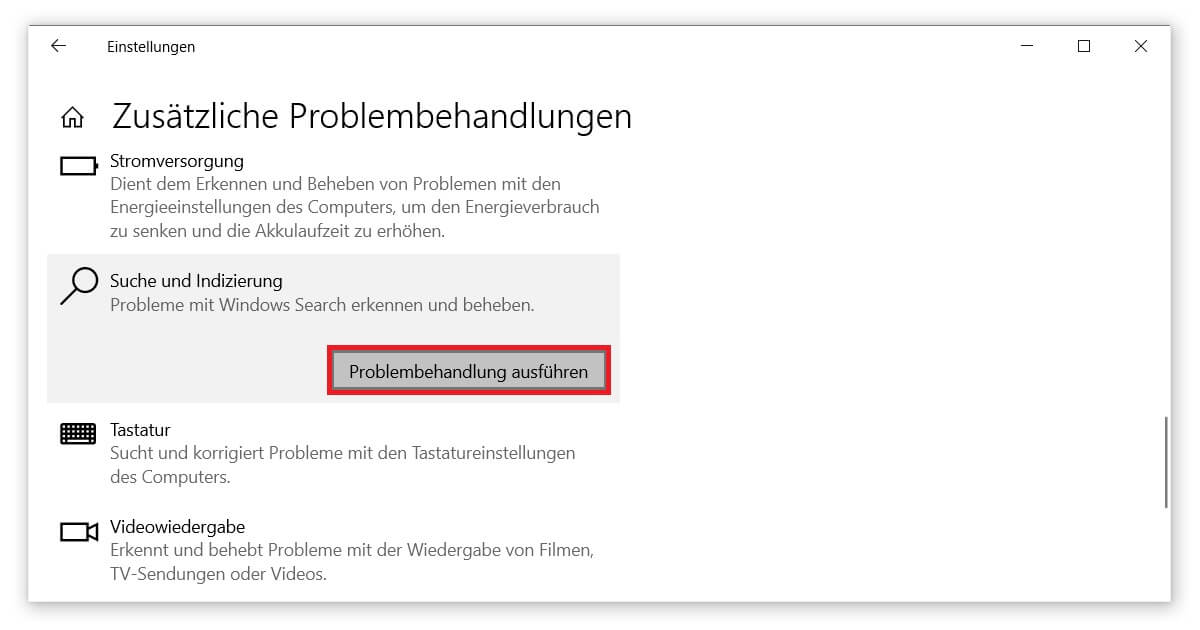
- Stay in the settings for Update and Security (or open them again via Windows logo key + I).
- This time, choose the Troubleshooting tab in the left margin.
- Click on Additional troubleshooting at the bottom.
- There you will find the button Search and Indexing under Additional Troubleshooting. Click on Run troubleshooter to automatically repair your Windows 10 Search.
3. Repair Windows 10 Search and Reset Process
Let’s now turn to the process behind the search bar, the SearchUI. This allows you to scan your entire hard drive, which is especially helpful for the Search for duplicate files search. If we reset this process, we can see whether the error was here:
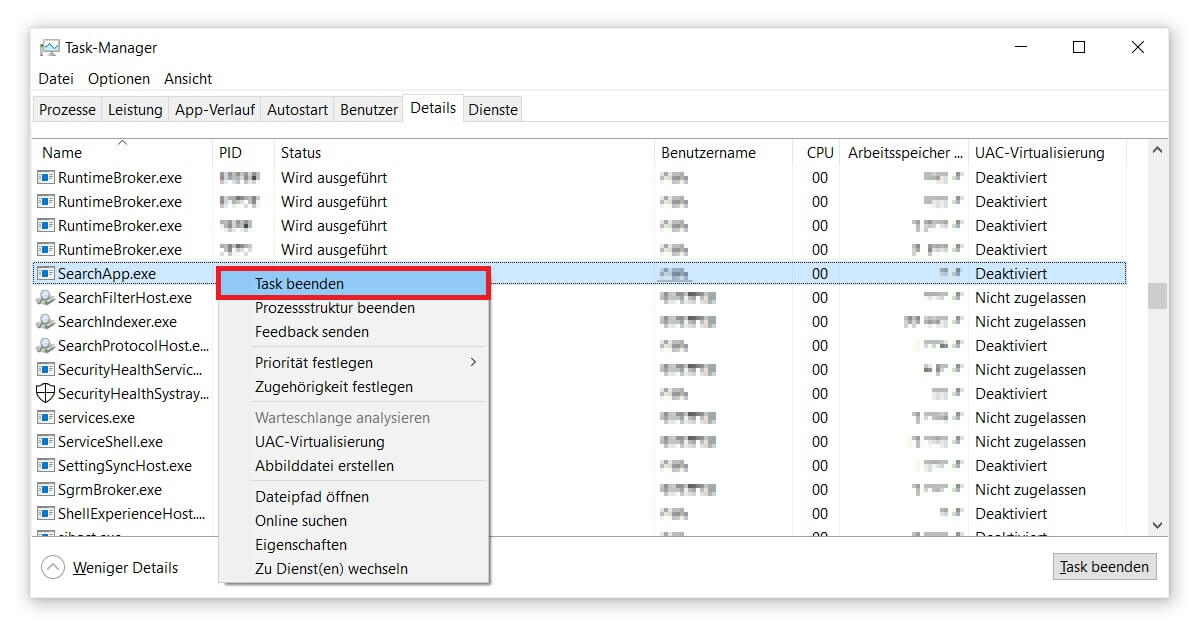
- Launch the Windows 10 Task Manager by pressing Ctrl + Shift + Esc.
- Select the Details tab. You may have to activate More Details first.
- Search for the SearchUI process. If this entry is missing, look for SearchApp.exe.
- Right-click to end the task. This will repair your Windows 10 search, as the process will restart itself.
4. In case of doubt: Activate the search bar again
It sometimes even happens that the Windows 10 search was deactivated by a random change. This can minimally disable your Speed up the start-up processbut makes it impossible to use the feature. Fortunately, this problem can be fixed quite easily:
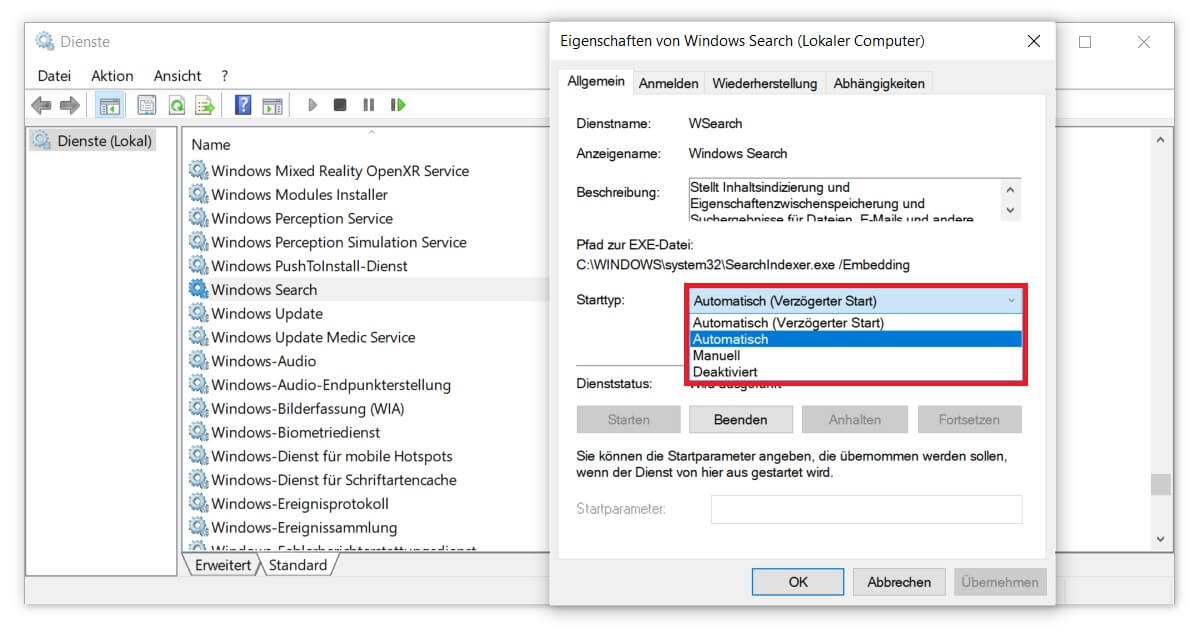
- Open System Services Management. To do this, first start the Windows Run command with the Windows logo key + R. Enter services.msc in the text field and confirm with Enter.
- Select Windows Search from the list of services. This is the only way to repair the search.
- Double-click to open the properties of Windows Search. Start type should be set to Automatic. Change this (if necessary) and confirm with OK. Done.
5. Comprehensive: Restore all default apps to factory settings
Pre-installed Apps and features more often lead to problems. This is especially annoying if the corresponding application has never been used. The search function is one of these standard programmes that are already present when Windows 10 is installed. Follow these instructions to restore the factory settings:
- Start Windows PowerShell as administrator. You can find the application via the access Windows logo key + X. Yes, you want changes to be made to your device.
- Copy the following text into the command line: Get-AppXPackage | Foreach {Add-AppxPackage -DisableDevelopmentMode -Register “$($_.InstallLocation)AppXManifest.xml”}
- Confirm your entry with Enter. Windows will then reinstall the entire package and should repair the search.
- To be on the safe side, restart your PC.

6. Check Cortana and fix Windows Search
If all these approaches have not led to a result, you still have one last option before you should talk to a specialist or at least Microsoft support. For example, with Windows Update KB4512941 (version 1903), bugs occurred in the search, which can be traced back to a high utilisation of Cortana. It would by no means be the first time that the voice assistant has caused Difficulties causes.
In order to repair the search in Windows 10, you must locate a folder created by Cortana. By default, you will find it under the path %LOCALAPPDATA%PackagesMicrosoft.Windows.Cortana_cw5n1h2txyewyLocalState. Simply open it in Explorer and delete the entire contents – and then the LocalState folder itself. The next time the PC is restarted, all this will be automatically regenerated.
You don’t need a voice assistant anyway? Then read through how you can easily Deactivate Cortana can. Maybe you won’t have to fix the search in the future, but can use Windows 10 without any problems.


