Anyone who has ever had to write an academic paper or edit a document at work will appreciate an automatic table of contents. This is where Word 2019 shines – whether in the Standard variant or as Professional Plus. The latest edition of Microsoft Office has been able to perfect many features of its predecessors. For example, Word now also has a integrated dictation function.
The option to create an automatic table of contents, on the other hand, is tried and tested. The advantage is that you don’t have to jump back and forth through the text or manually adjust the headings after each update. In addition, an automatic table of contents in Word also looks quite impressive.
We will show you step by step how to create such an automatic table of contents:
How do I create an automatic table of contents in Word?
- Formatting headings in Word
- Create an automatic table of contents in Word
- Update the table when the text changes
- Adapt the automatic table of contents to your ideas
First, you should set all relevant headings directly in Word.
1. Format headings in Word
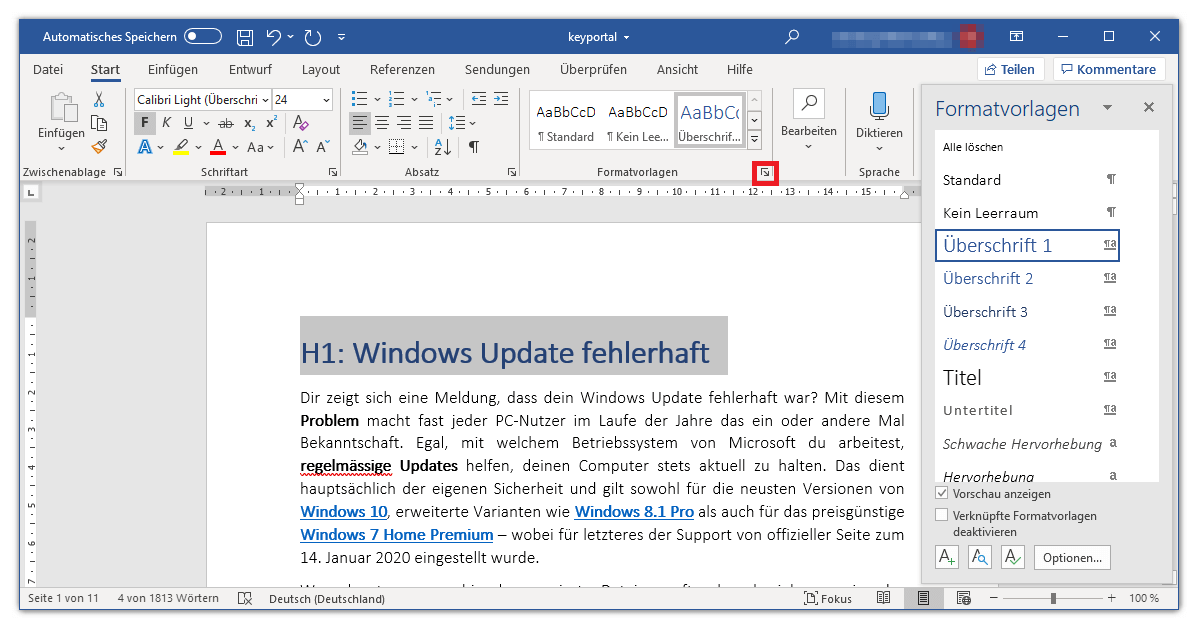
In the document that needs an automatic table of contents, you will find the format templates on the Start tab. You can either work with the preview or open a separate window for headings and other presets by clicking on Expand in the bottom right-hand corner(Alt + Ctrl + Shift + S). Now select the text and choose the appropriate heading.

Here in the screenshot you can see an example of the text for our Windows Update Help. If your document does not have a special title, you usually start with heading 1. For the following chapters, you follow the hierarchical list and distribute headings 2 and 3 according to the topic. The more subheadings you use, the more format templates Word offers you.
You have already completed the most difficult step towards an automatic table of contents. Now all that remains is to insert the actual overview.
2. Creating an automatic table of contents in Word
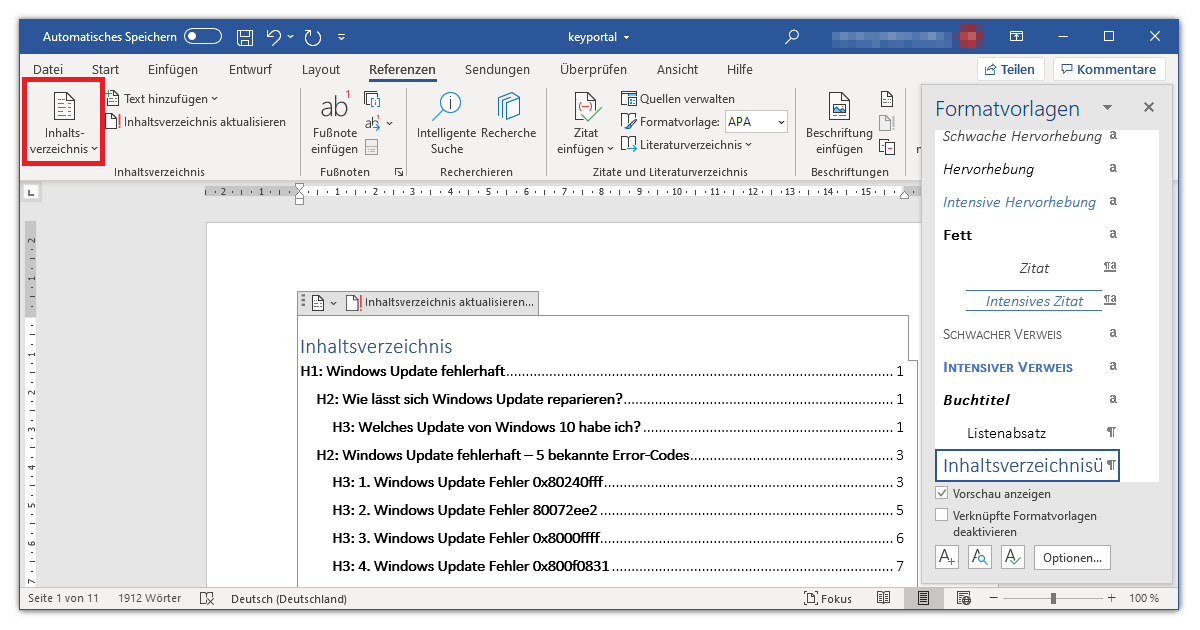
Once you have adjusted all the headings in your text, switch to the References tab. On the left side of the menu you should see the item Table of Contents. With a click on the button, Word outputs an automatic table of contents at the point you have just selected in the document. If you have also opened the window for format templates, a new option for further editing should appear there.

Basically, the steps described in these instructions apply equally to all modern Word versions. In Microsoft Office 2016 for example, you can proceed in the same way, except that the menu item there is called References .
3. Update the table when you change the text
As you can see in the screenshot above, you have the option to update the automatic table of contents by clicking on it. You have two options for this: Update page numbers only if you have not made any changes to the names of your headings. Alternatively, you can update the entire table of contents again before finishing the text and thus be on the safe side.
4. Customise the automatic table of contents
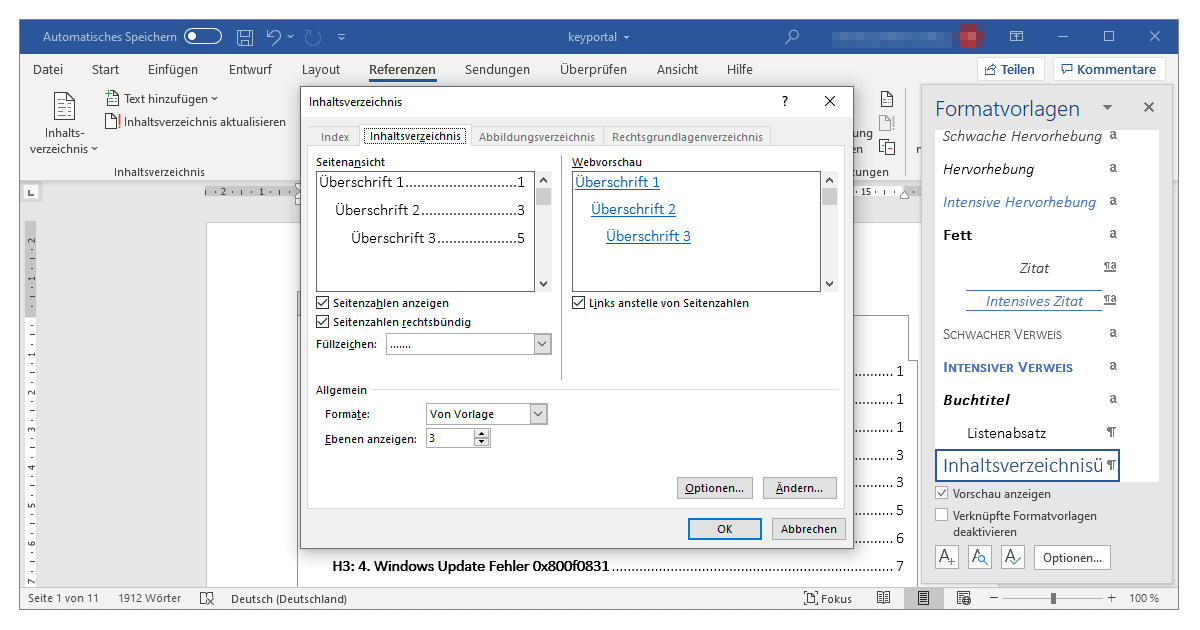
Still in the References tab, where you created the automatic table of contents before, you can format it afterwards. To do this, click on Table of contents again and select the item User-defined table of contents …. Now you have various options, as shown in the following screenshot:

For example, you can specify that the table should not display page numbers . Or change the fill characters from the default selected dots to a smooth line. The page view in the top left-hand corner gives you a preview of the effect of the format changes. Finally, under the item General further down, you have various additional settings at your disposal. For example, you can format the elements of each line of your table individually so that the fonts and font sizes correspond exactly to your wishes. You only get more leeway if you select the manual table instead of an automatic table of contents.
This will make you a little more familiar with the many useful functions of Microsoft Word. If you are still hesitating about the purchase, just take a look at the prices in our shop prices. A one-time licence that offers you the full range of functions including all essential updates is much cheaper than you might think. Our customers are inspires. If, on the other hand, you need help deciding between Office 365 and 2019, we also have an Article for you.


